Introduction #
Creating a puzzle programmatically is an interesting challenge I faced, which formed part of a wider project to create an online jigsaw puzzle app (WIP). I initially underestimated the approach required to achieve this, especially in a way that both looked satisfying, had reasonable levels of variation and would be flexible enough to work with different sizes of puzzle and number of pieces - as a result, I would like to share my solution alongside some of my thoughts and learnings on the topic. Before we dive in, I would like to acknowledge an excellent tool implemented in JavaScript, I did not use this as a source of inspiration for a number of reasons:
- I did not particularly understand the source code/approach (and was eager to learn and apply rather than lift and shift)
- It did not take a piece-by-piece approach
- It was in JS and I needed it in Python
However, If you are simply looking for an overall template which can create a puzzle of any size, or the above justifications do not apply to you, this is an excellent resource.
Cut #
The design of a puzzle cut is typically fed into a CNC, laser cutting machine which will trace the design with high precision leaving you with the individual pieces, and to ‘cut’ the puzzle up digitally, we will use a similar principle. However, rather than approaching the design as a whole, as you would for a physical puzzle, I instead generated an SVG made up of cut paths for every individual piece.
Design #
The design of the actual cut involved learning about SVG curves and how to connect them in a way that looked satisfying and could be procedurally generated. Overall the piece design I went with was similar to the conventional puzzle shape with either a notch or a gap on each of the interior piece sides, but with a more exaggerated curve to achieve a more unique look. I added randomness to introduce heterogeneity by determining whether each side of the piece was a notch or a gap. While there is randomness, the pieces are not truly unique. This is a trait which is valued by puzzle enthusiasts, as the uniqueness of each piece makes it easier to avoid ‘false fits’, which is where two pieces may seem to slot together perfectly, but are in fact not a match. Adding randomness (i.e. a jitter variable) into the curve values themselves would help achieve this and make the cut more interesting, and is a worthwhile future enhancement to this project (similar to Drardech’s implementation linked in the intro).
Masking #
The SVG paths are then used to mask each piece’s shape using a clipPath, this process loops through all of the pieces and outputs the piece files to a directory of your choosing.
Use cases #
- Create a digital puzzle set
- Create a blank template for a puzzle of any custom size
Github Repo #
Package #
I packaged this project so it could be easily installed and used locally or in other projects, you can find it listed on PyPI here along with installation instructions: https://pypi.org/project/pyjigsaw/
Examples #
First, install the module in a new project directory, I recommend setting up a venv:
pip install pyjigsaw
We will also be using the following image in the examples, so feel free to download it here
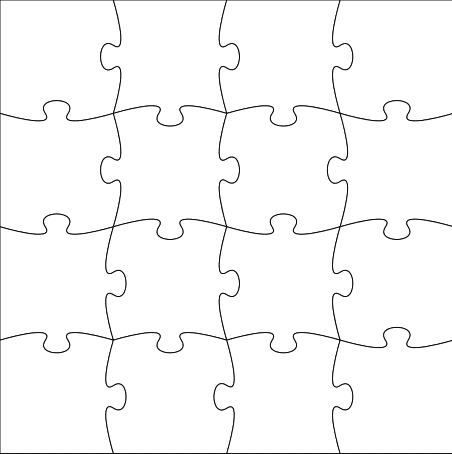
Creating a blank puzzle template #
from pyjigsaw import jigsawfactory

# Create a jigsaw cut template 500x500 pixels and 4x4 pieces
mycut = jigsawfactory.Cut(4, 4, 500, 500)

mycut.to_svg("template.svg")
./template.svg
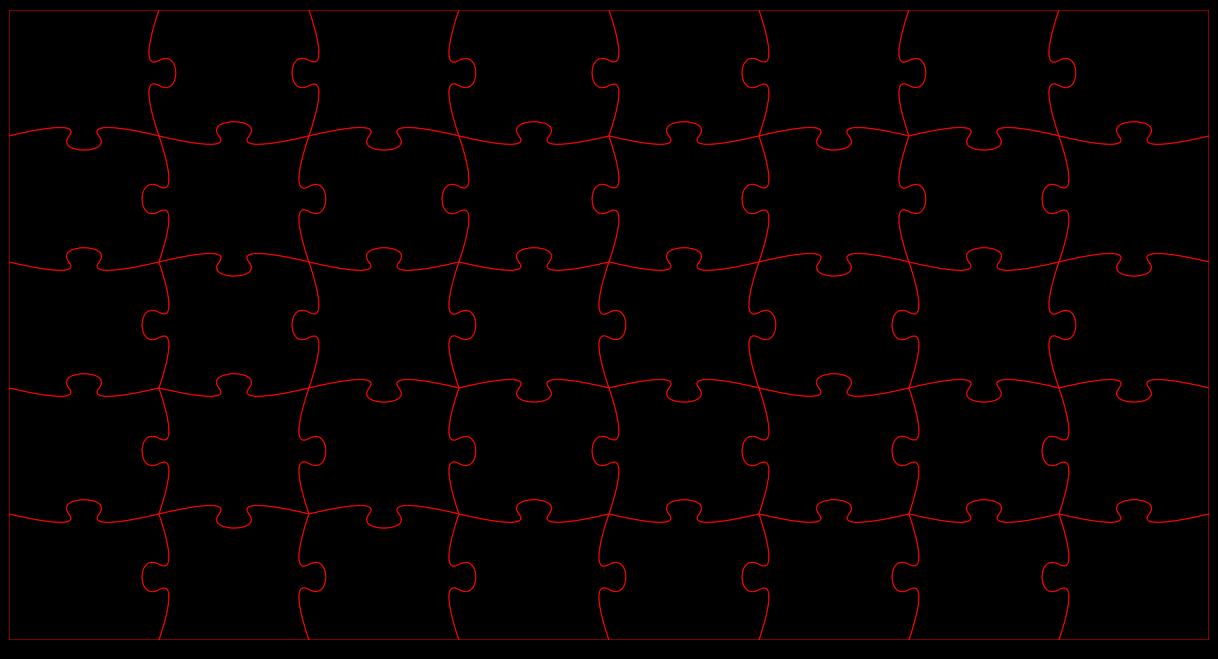
Creating a template using an image to set the size #
Rather than manually defining the size of the template in pixels, instead, we will pass an image which we have saved locally to determine the size. For this to work we need to pass the image file path and set use_image to True.
# Create a jigsaw cut template
mycut = jigsawfactory.Cut(5, 8, image="./Zugpsitze_mountain.jpg", use_image=True, stroke_color="red", fill_color="black")

mycut.to_svg("template.svg")
./template.svg
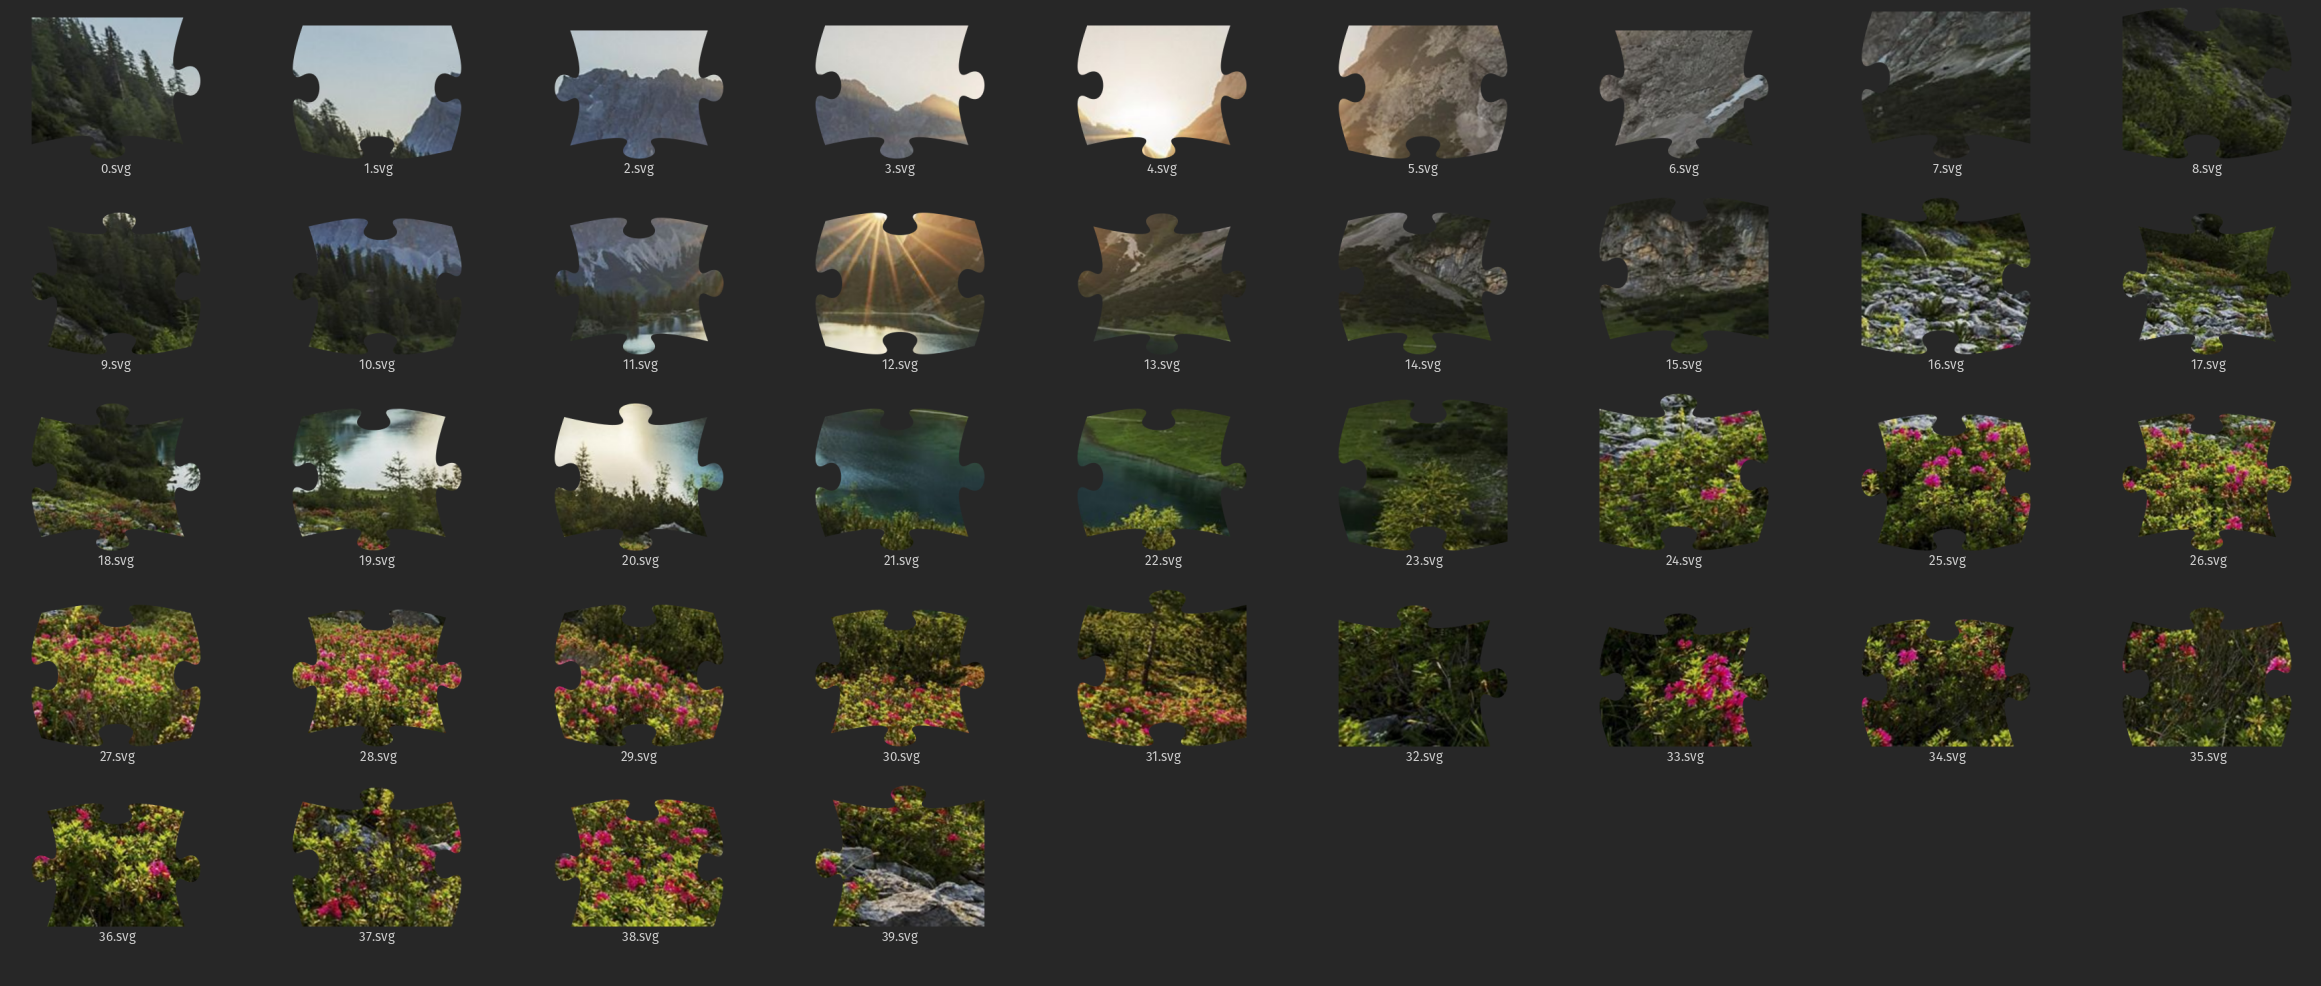
Generating a puzzle set #
Let’s use the same cut file generated in the previous example. To create a puzzle set, we need to pass a valid Cut object and the image we want to apply the cut. This does not necessarily need to be the same image we generated the cut template with, but in most cases, this will be what is required.
Bear in mind that this function does not automatically create the directory you pass to the generate_svg_jigsaw method, so make sure to create it before.
# Generate a jigsaw set from the cut template
myjig = jigsawfactory.Jigsaw(mycut, "Zugpsitze_mountain.jpg")
myjig.generate_svg_jigsaw("./Pieces")
The jigsaw set has now been generated in the provided directory and should appear as shown below
Etsy #
Some time between shelving my puzzle app and packaging and open-sourcing this project as a standalone package, I decided to try to showcase it by creating a pack of templates with the SVGs flattened for a wide array of size options so people could purchase them for laser cutting/CNC machines and offer them on Etsy, it is a surprisingly saturated niche and I listed it with no expectations. https://www.etsy.com/uk/listing/1567419311/21-jigsaw-puzzle-templates-laser-cut
Limitations #
While a bitmap masking approach is more straightforward, the SVG version contains the parts of the underlying image hidden by the mask, taking up an unnecessary amount of space. A potential improvement to my implementation would be to crop the underlying image to a slightly larger area than the puzzle piece, meaning that minimal excess image data is stored.
A limitation of using the bitmap version is the resolution of the pixels. The pieces are made up of curves which may cause unnatural or jagged-looking edges once converted. Where possible it would be advisable to use SVGs to retain the perfect curves.